Your Cart is Empty


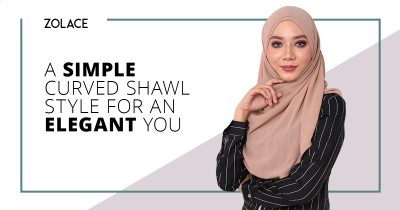
For this week Hijab Friday in Bahasa Malaysia, please click here Hi Zolace fans! Welcome back to another edition of Hijab Fridays! Today we're excited to share with you a curved shawl tutorial that you've probably been waiting for. After all, you might have been wanting to change up your same old curved shawl styles, so here's one for you!
Hi Zolace fans! Welcome back to another edition of Hijab Fridays! Today we're excited to share with you a curved shawl tutorial that you've probably been waiting for. After all, you might have been wanting to change up your same old curved shawl styles, so here's one for you! This look can be worn to many places, like school, work, shopping, or any function.
It's simple to do but still gives you an elegant and effortless appearance. We particularly love the drapes on the front and side of the face, it'll give you some added dimension and a fashionable aura in your everyday life. Today we're pairing this look with the Keep it in Line Tunic, a versatile piece you've got to add to your wardrobe! You will need our Zehna Chiffon Curved Shawl, 4 pins and 1 brooch-- here we go!

Start by placing the shawl over you and make one side longer than the other. It's really up to you which side is long or short. Feel free to try both and see what looks best on you.

Take the sides and bring them behind your neck securing them together with a brooch.

Now, take the longer side's inner edge and bring it around the top of your head, measuring it to make sure you have enough room to cover all the way around your face. Pin the first part at the top back part of your head and then line the hanging part around your chin to pin it next to the first piece. You should now have a nice rounded drape created on your front.

This next part is optional if you want to hide your inner, or it wasn't covered by the previous step. Feel free to use a couple pins to secure the shawl on each cheek. Now take the shorter side that is left hanging and tuck under your clothes. Make any final adjustments, and that's it, you're done!

Our Zehna Chiffon Curved Shawl is the perfect length to provide great coverage on the front and back, while being soft and delicate to create beautiful drapes. That's all for today. Thanks so much for joining us! We hope you enjoyed this tutorial so make sure you leave a comment below and let us know what your favorite curved shawl look is! Share this video with your friends and we'll see you next week for another edition of Hijab Fridays!